You can use DeepSeek with OpenCode by installing the current OpenCode release, connecting the official DeepSeek provider with a DeepSeek API key, and selecting an available DeepSeek model through OpenCode’s model picker. Direct DeepSeek access is separate from OpenCode Go, OpenCode Zen, and third-party gateways, so the required credentials, available models, billing, and data terms depend on the route you choose.
Last reviewed: October 13, 2026.
This guide uses the direct DeepSeek API connection documented by DeepSeek. It also separates OpenCode 1 from OpenCode 2 because both use the same opencode command but have different packages, configuration details, and credential storage.
What you need before starting
| Requirement | Why you need it |
|---|---|
| OpenCode | The coding agent that reads your project, sends relevant context to the selected model, and can propose or perform changes. |
| DeepSeek Platform account | Required to create a first-party DeepSeek API key. |
| DeepSeek API key | Authenticates OpenCode’s requests to the DeepSeek API. |
| Available API balance | Direct DeepSeek API requests are usage-billed. An insufficient balance can produce an HTTP 402 error. |
| A local project | OpenCode works inside the directory from which you launch it. |
| Git or another backup | Allows you to review and recover from AI-generated file changes. |
A DeepSeek chat account or chat subscription does not replace API access. You still need a key created through the DeepSeek API Platform, and the API account must be able to cover the requests OpenCode sends.
OpenCode 1 vs OpenCode 2: check before installing
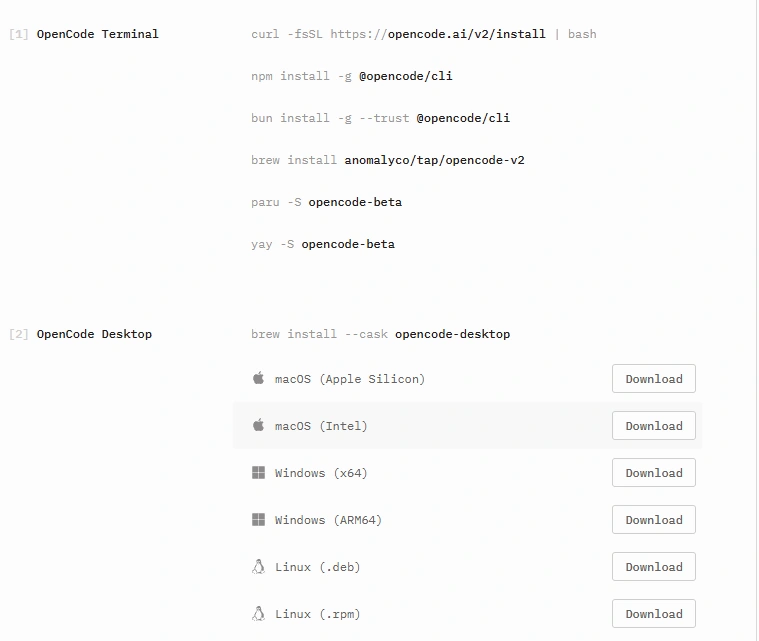
OpenCode 1 and OpenCode 2 both use the executable name opencode. They should not be installed side by side under that default command because one installation can replace or conflict with the other.
As of this review, the current OpenCode download page defaults to OpenCode 2. New users should generally install OpenCode 2. Existing OpenCode 1 users can continue with the official DeepSeek integration, but they should update before connecting the provider.
| Situation | Recommended action |
|---|---|
| You have never installed OpenCode | Install OpenCode 2 from the current download page. |
| You already use OpenCode 2 | Update it through the same installer or package manager you originally used. |
| You use OpenCode 1 and want to stay on it | Update to the newest v1 release. DeepSeek’s dedicated integration page recommends at least v1.18.30. |
| You want to move from v1 to v2 | Remove a package-managed v1 installation before installing v2. Back up custom configuration first. |
| You are unsure which version is installed | Run opencode --version before changing anything. |
DeepSeek’s official pages currently show two older minimum-version references: its dedicated OpenCode page recommends v1.18.30 or later, while its broader coding-agent guide mentions v1.14.24. If you remain on OpenCode 1, follow the newer, product-specific requirement and update to at least v1.18.30.
Step 1: install or update OpenCode
Install OpenCode 2 on macOS or Linux
The current OpenCode 2 installation script is the most direct route for a fresh terminal installation.
curl -fsSL https://opencode.ai/v2/install | bashClose and reopen the terminal after installation if the opencode command is not immediately available.
Install OpenCode 2 with Homebrew
brew install anomalyco/tap/opencode-v2Use this route on macOS or another system with a supported Homebrew installation.
Install OpenCode 2 with npm
Use npm only when a current Node.js and npm installation is already available.
npm install -g @opencode/cliThe OpenCode 1 package was named opencode-ai. Do not copy that older package name into a fresh OpenCode 2 setup.
Install OpenCode 2 with Bun
bun install -g --trust @opencode/cliInstall OpenCode on Windows
OpenCode 2 provides standalone Windows binaries for x64 and ARM64 systems through the official download page. This is the clearest native Windows route.
You can also run the Linux version inside Windows Subsystem for Linux. WSL is useful when your project already depends on Linux tools, shell scripts, permissions, or container workflows. It is not mandatory for every OpenCode 2 user because native Windows binaries are available.
When using WSL, install and run OpenCode inside the Linux distribution, then work with projects stored in that environment where possible. Mixing Windows and Linux paths can create slower file access or confusing permission behavior.
Verify the installation
Run this command in your operating-system terminal:
opencode --versionA successful result confirms that the executable is installed and available through your shell’s PATH. Record the major version before following configuration or troubleshooting instructions.
Update an existing OpenCode 1 installation
OpenCode 1 supports its built-in upgrade command:
opencode upgradeOpenCode 2 users should update through the same installation method used originally, such as its official installer, Homebrew, npm, Bun, or a replacement standalone binary. Do not use an OpenCode 1 package name to update OpenCode 2.
Step 2: create a DeepSeek API key
- Sign in to the official DeepSeek Platform.
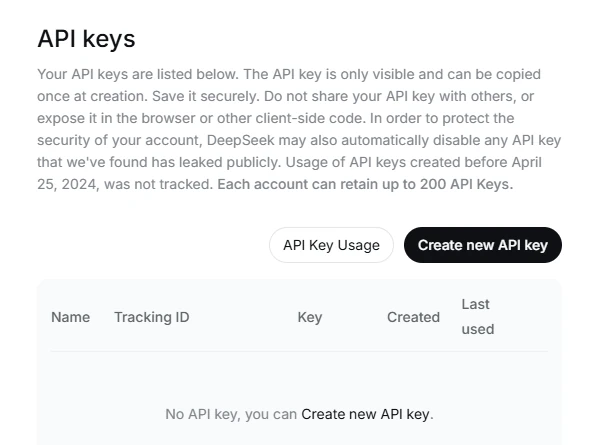
- Open the API Keys page.
- Create a new API key for your OpenCode connection.
- Copy the key and store it in a password manager or another secure credential store.
- Check your API account balance before sending the first request.
For account, key, and first-request checks, use our DeepSeek API setup guide.
Do not paste the key into a project file, AGENTS.md, README, source-code comment, screenshot, public GitHub issue, or shared chat. OpenCode’s interactive connection flow stores the credential for the provider, so there is normally no reason to hardcode it in your repository.
If a key is exposed, revoke it through the DeepSeek Platform and create a replacement. Removing it from a Git commit does not make the exposed key safe again.
Step 3: connect DeepSeek to OpenCode
The following workflow uses the built-in provider connection. You do not need to define a custom API base URL when the current DeepSeek provider is available in OpenCode.
1. Start OpenCode
Open a terminal and move into the project you want OpenCode to use. This example uses a project named sample-app in the current user’s projects directory.
cd ~/projects/sample-app
opencode
The first line changes the working directory. The second starts OpenCode in that project.
2. Open the provider connection menu
Inside the OpenCode interface—not in the operating-system terminal—enter:
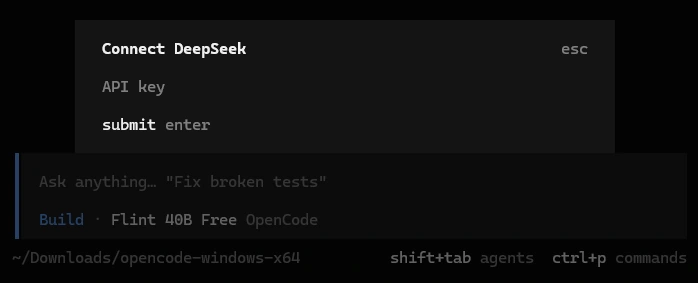
/connectSearch for and select DeepSeek. Make sure you choose the first-party DeepSeek provider rather than OpenCode Go, OpenCode Zen, OpenRouter, or another gateway.
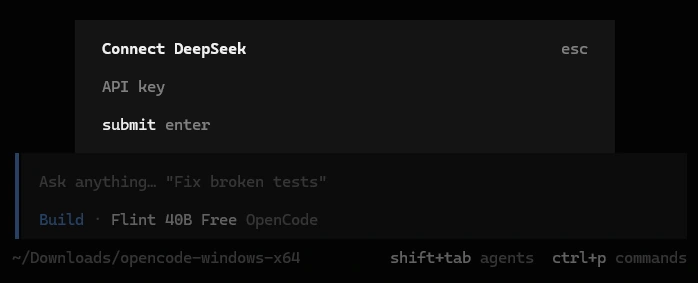
3. Enter the DeepSeek API key
Paste the key created through DeepSeek Platform when OpenCode asks for the provider credential. Do not paste it into the conversation as a normal message.
4. Open the model picker
Still inside OpenCode, enter:
/modelsSelect a model listed under the connected DeepSeek provider. Prefer the newest first-party DeepSeek Flash entry available to your account for a general coding setup.
5. Confirm the connection
Send a small read-only request before allowing file edits or shell commands:
Read the project structure and identify the main entry points. Do not edit files or run commands. Briefly explain which files I should inspect first.If DeepSeek returns a relevant answer based on the project, the provider, API key, and selected model are working. If it fails, use the troubleshooting section before changing unrelated project settings.
Alternative connection command
OpenCode 2 also supports provider authentication through the operating-system terminal:
opencode auth loginChoose DeepSeek from the provider list and enter the credential. This is an alternative to /connect, not an additional requirement. You do not need to authenticate through both paths.
Direct DeepSeek API vs OpenCode Go, Zen, and OpenRouter
These routes can expose some of the same model families, but they are separate services.
| Connection route | Credential used | Who handles billing and model access? |
|---|---|---|
| Direct DeepSeek provider | DeepSeek API key | DeepSeek Platform |
| OpenCode Go | OpenCode account or service credential | OpenCode’s hosted service |
| OpenCode Zen | OpenCode service credential | OpenCode’s hosted model service |
| OpenRouter | OpenRouter API key | OpenRouter |
| Another gateway | That provider’s API key | The selected gateway |
This guide uses the direct DeepSeek route. A DeepSeek API key will not authenticate an OpenCode Go or OpenRouter account, and their prices, model identifiers, limits, and privacy terms should not be treated as first-party DeepSeek rules.
Which DeepSeek model should you choose?
Use OpenCode’s current /models list as the source of truth for the models available through your connected provider. Model display names and API identifiers are not always identical.
| Model shown or documented | First-party API identifier | Best fit |
|---|---|---|
| DeepSeek V4.1 Flash or the newest Flash entry | deepseek-flash | General coding, repository analysis, routine edits, and faster iterative work. |
| DeepSeek V4 Pro | deepseek-v4-pro | More demanding tasks when the model is available to the account and its additional usage cost is justified. |
DeepSeek’s dedicated OpenCode integration page currently refers to DeepSeek-V4-Flash, while its broader coding-agent guide refers to DeepSeek-V4.1-Flash. The first-party API documentation uses deepseek-flash. Because display labels can change faster than tutorials, select the newest Flash model displayed under the DeepSeek provider instead of typing a guessed model ID.
Do not choose a model solely because it has “Pro” in its name. Start with the current Flash model, confirm that tools and edits work, and move to another model only when the task requires it.
For a more detailed routing decision, read our DeepSeek Flash vs Pro comparison.
Step 4: use DeepSeek with a real project
Connecting the provider is only the first part of the workflow. Use the following sequence to reduce accidental edits and make the model’s work easier to review.
1. Check the repository before starting
Run this outside OpenCode:
git status --shortCommit, stash, or back up important changes before allowing an AI agent to modify the project. OpenCode’s snapshots and undo features are useful, but they should not replace version control or a backup.
2. Give OpenCode persistent project instructions
OpenCode 2 recognizes an AGENTS.md file containing repository-specific instructions. Place it in the project root and commit it so that future sessions follow the same rules.
# Project instructions

- Follow the existing code style and directory structure.
- Ask before editing files or running shell commands.
- Never read or modify .env files, credentials, private keys, or production data.
- Do not change dependencies unless the task requires it.
- Keep changes limited to the requested feature or bug.
- Show the affected files and test plan before implementation.
- Run relevant tests after approved changes.
OpenCode 1 users may see older guides recommending /init to analyze the repository and generate AGENTS.md. Current OpenCode 2 documentation focuses on the file itself rather than that older initialization workflow. Do not assume a v1 slash command exists in every v2 release.
3. Begin with repository analysis
Read this repository without editing files or running commands. Summarize the architecture, entry points, important dependencies, test structure, and any areas that need clarification.Review the answer before moving forward. Correct incorrect assumptions about the framework, runtime, build system, or project goal.
4. Request a plan before code changes
Plan the smallest change needed to add validation to the existing user-registration flow. Do not edit files yet. List the files you expect to touch, the behavior that will change, possible regressions, and the tests that should be run.A useful plan should identify specific files, explain the intended behavior, and avoid unrelated refactoring. Ask for a revised plan if the proposed scope is too broad.
5. Approve a controlled implementation
Implement only the approved validation change. Do not modify unrelated files or dependencies. Ask before running any destructive command. When finished, summarize the edits and list the tests you ran.Review every permission request. A command being suggested by the model does not make it safe or necessary.
6. Inspect the changes yourself
git status --short
git diff --stat
git diff
Check that only expected files changed. Run the project’s documented tests yourself and confirm the behavior before committing.
Control file edits and shell commands
OpenCode can do more than answer questions. Depending on its version, configuration, and permissions, it may read files, edit code, run shell commands, or access locations outside the immediate project.
OpenCode 2 permission rules support three practical outcomes:
- Allow: the action proceeds automatically.
- Ask: OpenCode requests approval before acting.
- Deny: the action is blocked.
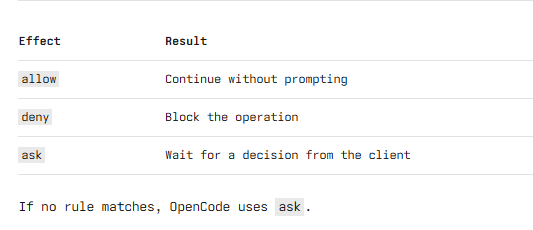
For a new repository, configure file edits and shell commands to ask for approval. Deny access to secret files such as .env, private keys, cloud credentials, production configuration, database exports, and customer data.
The v1 and v2 permission schemas are not interchangeable. Use the OpenCode 2 permissions documentation for a v2 installation and the matching v1 documentation for OpenCode 1. Do not paste a configuration written for the other major version.
- Keep edits inside the active project.
- Do not approve unfamiliar package-installation scripts.
- Review commands that delete, move, overwrite, publish, deploy, or push data.
- Block access to external directories unless the task genuinely requires it.
- Do not grant unrestricted automatic access to an unfamiliar repository.
- Review diffs before committing or deploying.
- Run tests independently rather than relying only on the model’s summary.
How to switch DeepSeek models
Enter /models inside OpenCode and select another model under the connected DeepSeek provider. This changes the model used by the current session without requiring a new API key.
Do not manually type a model name copied from an old article. Choosing from the current picker reduces errors caused by retired display names, legacy aliases, or unsupported provider/model combinations.
How to make DeepSeek the default model
OpenCode 2 can define a default model through its configuration. The project configuration can be stored in opencode.json or opencode.jsonc in the project, while a global configuration can be stored under ~/.config/opencode/.
The model property uses a full provider/model value. Copy that exact value from the current OpenCode model picker or official model listing. Do not construct it from the marketing name because the display label and model identifier may differ.
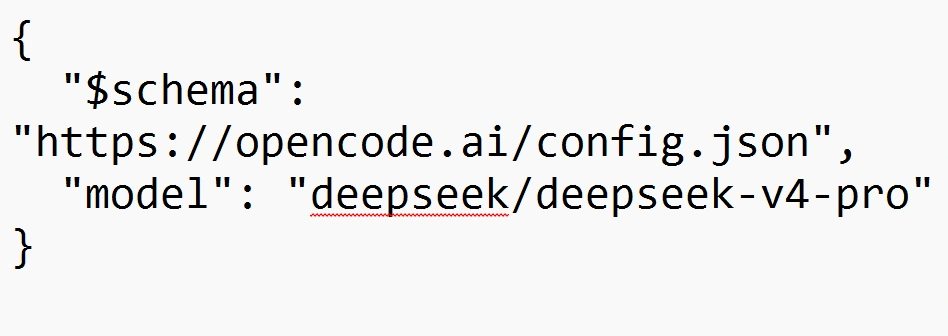
Example OpenCode configuration setting the first-party DeepSeek V4 Pro model as the default.Use project-level configuration when one repository should always use DeepSeek. Use global configuration only when DeepSeek should be the default across unrelated projects. Never place the API key in this configuration file.
Is using DeepSeek with OpenCode free?
OpenCode is open-source software, but that does not make first-party DeepSeek API usage free. Direct API requests are billed by DeepSeek according to the selected model and the amount of input and output processed.
Estimate the workload with our DeepSeek pricing and cost examples before a large repository run.
Check the current official DeepSeek API pricing page before starting a large repository analysis. Prices, model availability, cached-input treatment, and promotional terms can change.
OpenCode Go and OpenCode Zen use separate service arrangements. Their subscriptions or credits do not automatically fund a direct DeepSeek API key, and a DeepSeek balance does not pay for those OpenCode-hosted services.
Troubleshooting DeepSeek in OpenCode
| Symptom | Likely cause | Best first action |
|---|---|---|
opencode: command not found | Installation failed or the executable is not on PATH | Reopen the terminal, run the official installer again, and verify with opencode --version. |
DeepSeek is missing from /connect | Outdated or incorrect OpenCode installation | Check the major version and update through its official installation route. |
| DeepSeek is connected but no model appears | Provider authentication, model access, or stale model catalog issue | Reconnect the provider, then reopen /models. |
| HTTP 401 | Incorrect, revoked, or malformed API key | Create or copy a valid DeepSeek key and reconnect. |
| HTTP 402 | Insufficient API balance | Check the DeepSeek Platform balance and add funds if needed. |
| HTTP 429 | Requests are arriving too quickly or account concurrency is exhausted | Stop parallel sessions, wait, and retry with fewer simultaneous requests. |
| HTTP 500 | DeepSeek server error | Retry after a brief pause and check whether the problem persists with a small request. |
| HTTP 503 | Temporary service overload | Wait and retry rather than repeatedly reconnecting the API key. |
| Model not found | Old, mistyped, or unsupported model identifier | Select the model through /models instead of typing an ID from an old guide. |
| Request hangs or fails intermittently | Network, proxy, firewall, provider availability, or large context | Try a small prompt, check the network, and inspect OpenCode’s service status and logs. |
| Configuration fails to load | Invalid JSON or JSONC, wrong major-version schema, or conflicting files | Temporarily move the custom configuration aside and retry with the default setup. |
Fix an HTTP 401 error
- Confirm that the key came from the official DeepSeek Platform.
- Check whether the key was revoked or replaced.
- Reconnect DeepSeek through
/connectoropencode auth login. - Paste the credential only when OpenCode requests it.
- Retry with a short read-only prompt.
Do not publish the key or a screenshot containing it while requesting support.
Fix an HTTP 402 insufficient balance error
A successful API-key connection does not confirm that the account can pay for a request. Open the DeepSeek Platform, check the API balance, and review the current billing status. After resolving the balance issue, retry the same small request; you should not need to reinstall OpenCode.
Fix an HTTP 429 rate-limit error
Close duplicate OpenCode sessions, stop parallel agents, and avoid immediately resubmitting the same task. DeepSeek applies account-level concurrency limits, so several active sessions can affect one another. Retry after activity has decreased.
Fix a missing or unavailable DeepSeek model
- Confirm that DeepSeek is the connected provider.
- Open
/models. - Select a model actually listed for that provider.
- Remove an old hardcoded model value from the project configuration if it points to a retired name.
- Restart OpenCode and try the selected model with a short prompt.
Do not convert a display name such as “DeepSeek V4.1 Flash” into an assumed provider/model string. Use the exact identifier exposed by the current picker.
Fix OpenCode provider errors
OpenCode 1 may surface provider failures with names such as ProviderModelNotFoundError, ProviderInitError, or AI_APICallError. OpenCode 2 may describe equivalent failures differently.
- ProviderModelNotFoundError: reselect the model through the picker and remove an obsolete model ID from configuration.
- ProviderInitError: reconnect the provider, confirm the key, and check for invalid provider configuration.
- AI_APICallError: inspect the underlying HTTP status, network connection, API balance, and DeepSeek service response.
Do not treat all three errors as authentication failures. The underlying status or log entry determines whether the problem is the key, balance, model, network, request parameters, or service availability.
Check OpenCode 2 service health
OpenCode 2 users can run these commands in the operating-system terminal:
opencode service status
opencode api get /api/info
If the local OpenCode service is stuck, restart it:
opencode service restartRestarting the local service does not repair an invalid DeepSeek key or insufficient API balance, so check the HTTP error before using this step.
Inspect logs without exposing secrets
On macOS and Linux, OpenCode 2 commonly stores its log at:
~/.local/share/opencode/log/opencode.logBefore sharing a log, remove API keys, authorization headers, source code, private file paths, account details, customer information, and proprietary prompts.
Protect your DeepSeek API key and source code
OpenCode sends relevant prompts and project context to the selected model provider so that the model can answer questions and propose changes. Connecting a hosted DeepSeek model does not mean inference happens entirely on your computer.
- Remove API keys, private keys, passwords, tokens, and production credentials from files the agent can access.
- Keep
.envfiles outside the model’s readable scope where possible. - Do not paste customer, patient, employee, legal, or confidential client data into a consumer coding workflow.
- Review the applicable DeepSeek privacy policy and organizational rules before sending proprietary code.
- Do not publish OpenCode logs or session content without redacting sensitive information.
- Revoke an exposed DeepSeek key instead of merely deleting it from the visible file.
Where OpenCode stores the provider credential
OpenCode 2 stores provider credentials in its local database rather than writing new credentials to the older v1 authentication file. On macOS and Linux, the usual database path is under ~/.local/share/opencode/.
To print the actual OpenCode 2 database path, run:
opencode debug paths dbDo not manually edit the database. Manage providers through /connect or the supported authentication commands.
OpenCode 1 stores credentials in:
~/.local/share/opencode/auth.jsonThis version difference is important when troubleshooting a replaced key or migrating between major releases.
Remove or replace DeepSeek credentials
OpenCode 2 can list and remove configured authentication through its CLI:
opencode auth list
opencode auth logout
After removing the old provider credential, reconnect with /connect or opencode auth login. If the original key may have been exposed, revoke it on DeepSeek Platform before creating a replacement.
Final setup checklist
- OpenCode’s major version is known and current.
- Only one default
opencodeinstallation is active. - The API key was created through the official DeepSeek Platform.
- The DeepSeek API account has sufficient balance.
- DeepSeek was selected through
/connectoropencode auth login. - The model was selected through
/models. - A small read-only prompt completed successfully.
- The project is committed or backed up.
- An
AGENTS.mdfile defines project rules where useful. - File edits and shell commands require review.
- Secrets and confidential data are outside the model’s accessible context.
- Generated changes are inspected and tested before committing.
Frequently asked questions
Can OpenCode use DeepSeek directly?
Yes. OpenCode includes a provider connection workflow for DeepSeek. Use /connect, choose the first-party DeepSeek provider, enter a DeepSeek API key, and select an available model through /models.
Do I need a DeepSeek API key?
You need a DeepSeek API key when connecting directly to the first-party DeepSeek provider. An OpenCode Go, OpenCode Zen, OpenRouter, or other gateway connection uses that service’s own credential instead.
Can I use a DeepSeek chat subscription instead?
No. Access to DeepSeek’s consumer chat does not replace the API key and API balance required by the direct provider connection in OpenCode.
Can I use DeepSeek with OpenCode on Windows?
Yes. OpenCode 2 provides native Windows x64 and ARM64 binaries. WSL is also useful for projects that rely on Linux tools or Unix-like development workflows, but it is not required for every user.
Why does DeepSeek not appear in OpenCode?
The usual causes are an outdated OpenCode installation, a conflicting v1 and v2 setup, or a stale provider catalog. Confirm the version, update through the correct installation method, restart OpenCode, and reopen /connect.
Does OpenCode send my source code to DeepSeek?
Relevant prompts and project context must be sent to the selected hosted model provider for it to analyze or modify the project. Do not give OpenCode access to secrets, regulated records, or proprietary files that your organization does not permit you to send to DeepSeek.
Does the OpenCode thinking command enable DeepSeek reasoning?
Do not assume that showing or hiding reasoning text changes the model’s underlying reasoning mode. Use only the model variants and reasoning options exposed by the current DeepSeek provider in OpenCode. If no supported variant appears, avoid copying an unofficial parameter or configuration workaround from an older issue.
Official resources
- DeepSeek’s official OpenCode integration guide
- DeepSeek coding-agent integration guide
- DeepSeek API Keys
- DeepSeek API pricing
- DeepSeek API error codes
- DeepSeek API rate limits
- OpenCode downloads
- OpenCode 2 provider documentation
- OpenCode 2 model documentation
- OpenCode 2 permissions
- OpenCode 1 to OpenCode 2 migration guide